Hair Color Woes

Hair color can lift your entire look, making you appear younger, fresher and more glam. If done incorrectly, however, it can cause irreversible damage. Here’s how to stay trouble-free.
The Do’s:
1. Do read the label carefully. Semi-permanent dyes are less drastic than permanent ones. They come in two intensities – level 1 simply coats the hair shaft and lasts around 10 washes; level 2 penetrates the cuticle and lasts for around 20 washes. Permanent dyes (level 3) give the most dramatic results, but they are also harsher on your strands. Besides, they require frequent root touch-ups. You can also experiment with temporary, wash-out highlights that can be sprayed on or painted with mascara-like wands. Try Schwarzkopf Igora Action Paint for a fun, dramatic change sans tress damage.
2. Do a skin patch test 48 hours before coloring to check for adverse reactions. Ammonia in dyes causes anything from mild itching to uncomfortable burning. Paraphenylenediamines (PPD) can be absorbed through the skin and cause itchiness, headaches and pustules. Peroxide is corrosive. To test, put a small sample of the mixture on your arm (ask the salon to mix you a spoonful if it’s a professional job). If there’s any itching or burning sensation over the next few days, the formulation is not right for your skin type.
3. Treat your hair with extra TLC post-coloring. Ordinary shampoos will fade color so it is advisable to switch to products specially formulated for colored hair, and pamper with an intensive conditioner once a week to prevent strands becoming brittle. We like Wella Biotouch Nutrition Care Color Shampoo and Conditioner, L’Oreal Paris Elvive Shampoo and Conditioner For Colored Hair.
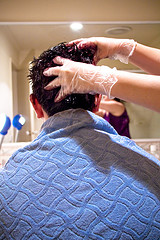
4. Smear petroleum jelly around your hairline and on your ear tips to prevent staining. Avoid contact with skin, drape a plastic sheet or towel across your shoulders. If color does get onto your skin, gently massage it out with a facial scrub.
5. Brush up on your salon lingo. ‘Highlights and lowlights’ involve streaking a few locks for a multi-tonal effect. ‘Slices’ are a lot bolder and chunkier, while ‘balayage’ (also referred to as ‘hair painting’) involves painting highlights directly without foils.
6. Follow the proper procedures when going DIY. Read instructions carefully. When applying a darker tint, start from the back and save the strands around your face for the end. The front of your hair is most porous (blame daily wear and tear), so it will absorb more color. To lighten up, begin in the front and work your way backwards. This will make you seem more naturally ‘sun kissed’.
7. Touching up your roots? Apply color to half the regrowth (closest to your scalp), then blend it outwards so that it doesn’t bleed onto the part that’s already been processed. And remember to take off any metal clips or jewellery. They may react with pigments in the dye and distort the color. Make sure you use the right containers to store or mix the contents.
8. In all-over tinting, the whole head is tinted in one or more solid colors. Once you get an all-over tinting done, you can add highlights, lowlights, balayage or slices to this to create further dimension if you wish.